Trial & Error
  • Trial and Error
  • Film
  • Blog
  • [Galleries]
  • [Scans]
  • Contact

Processing C-41 at 38°C vs 30°C

3/28/2016

3 Comments

 
Following up on the previous post in which I detailed my process for developing C-41, here is a quick experiment trying to develop at 38°C instead of the 30°C I have used until now. According to the feedback I got from experts, there are probably more disadvantages than just the timing when lowering the processing temperatures. You may follow the discussion on APUG for all the details.
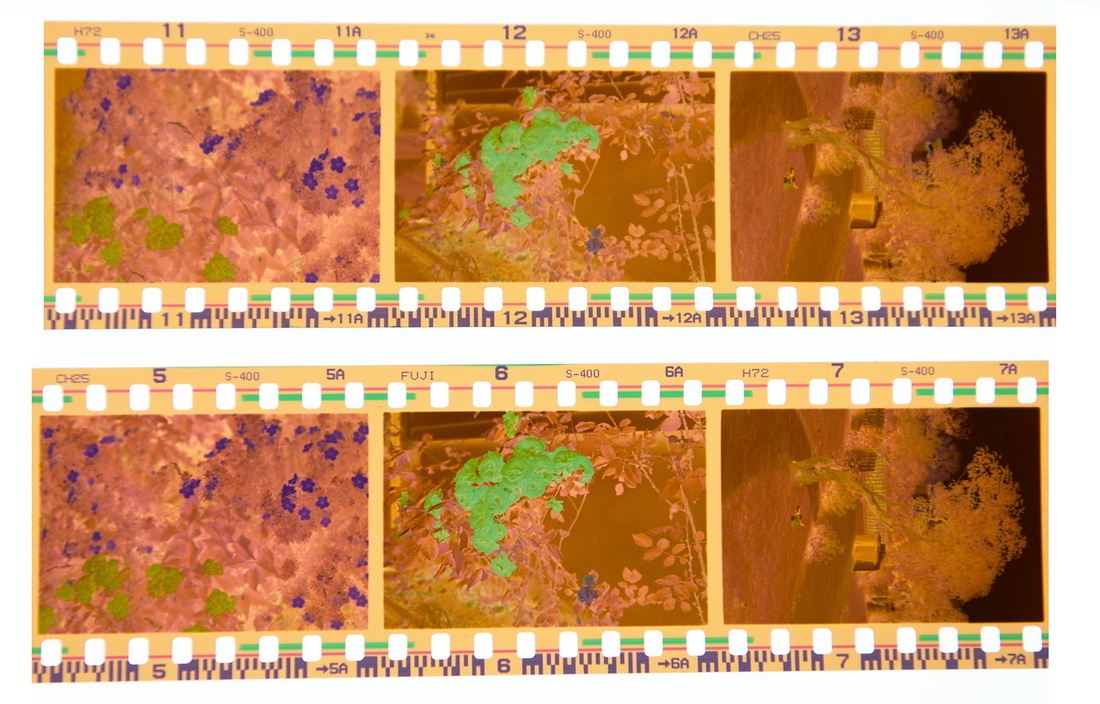
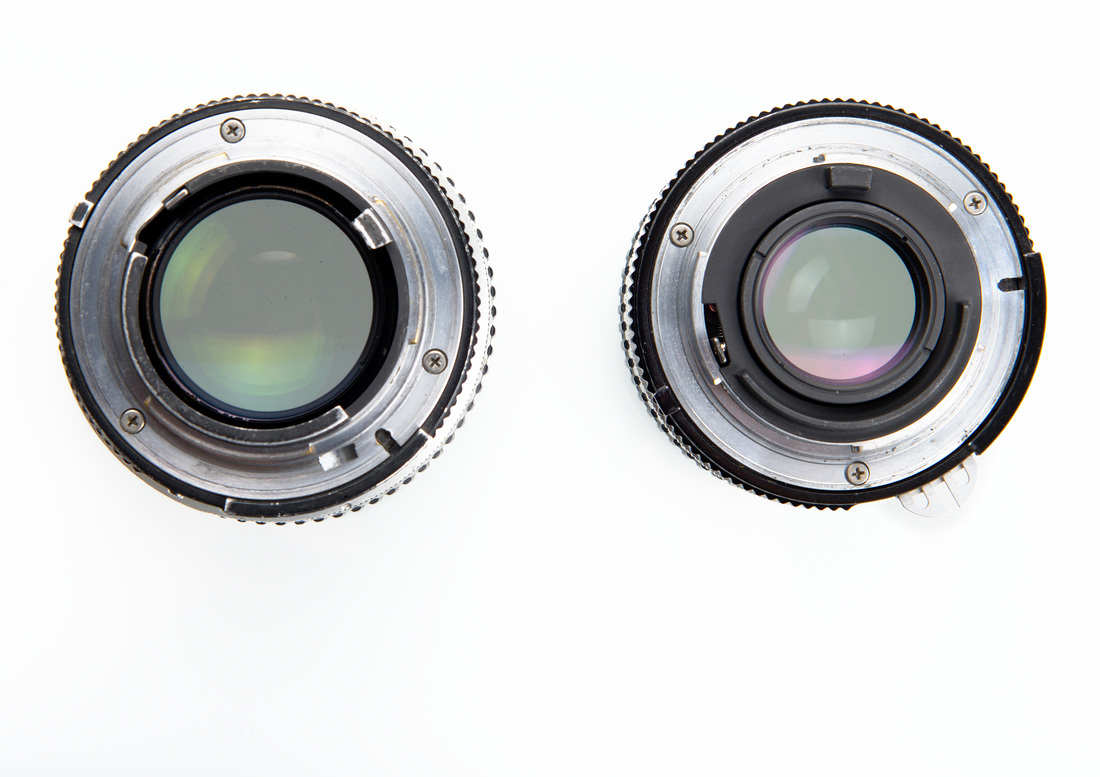
Anyway, as a first test, I just developed a piece of the test roll I use to check my chemistry at 38°C to see how the results would compare with a piece of the same roll developed previously at 30°C. The picture on the right shows the two strips side by side photographed on the light table. There are some differences which are visible straight away on those two negatives. The bottom one is a bit more dense and a bit more reddish than the top one. To me this is quite a big difference. Typically I use this test to compare the results I get with with old chemistry with those I get with fresh chemistry. All the other strip I have developed were processed at 30°C and look very close to each others. I really cannot tell the difference by just looking a the negative. 
Picture
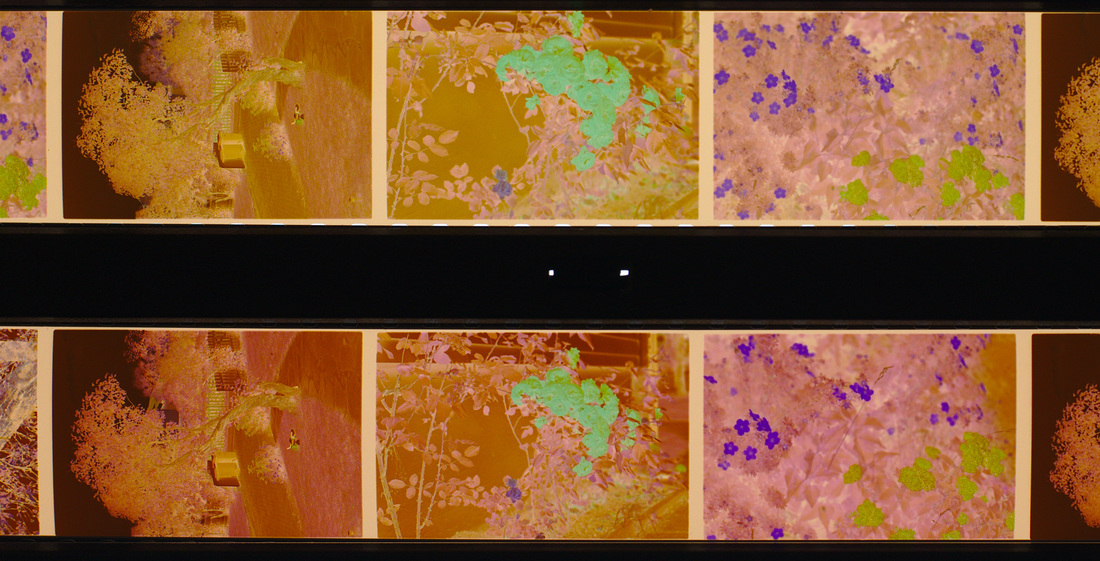
The two film strips, one processed at 30°C and one at 38°C.
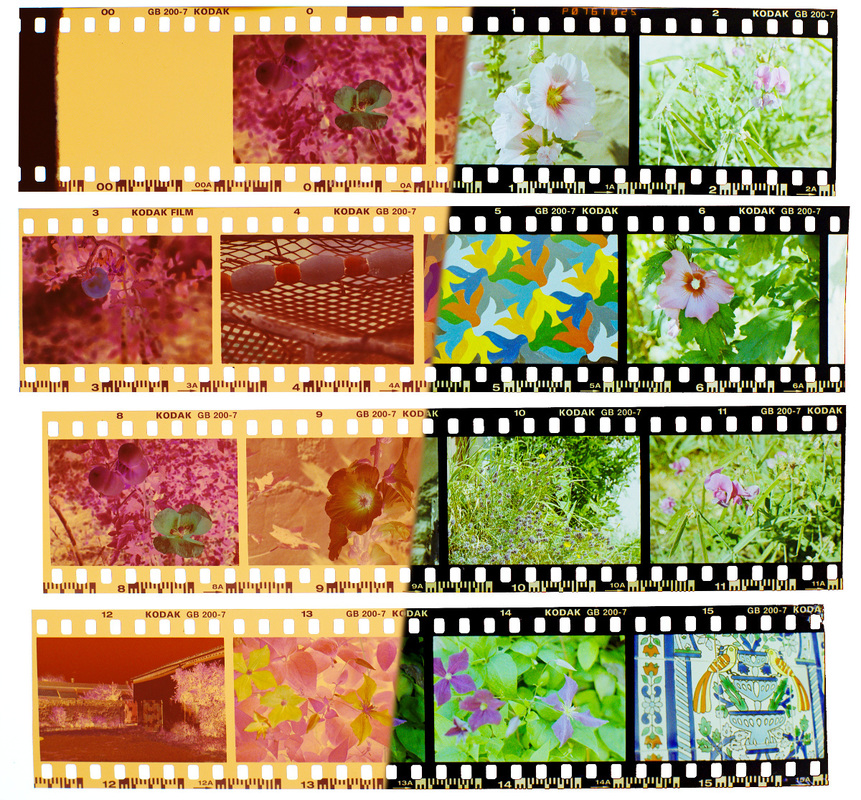
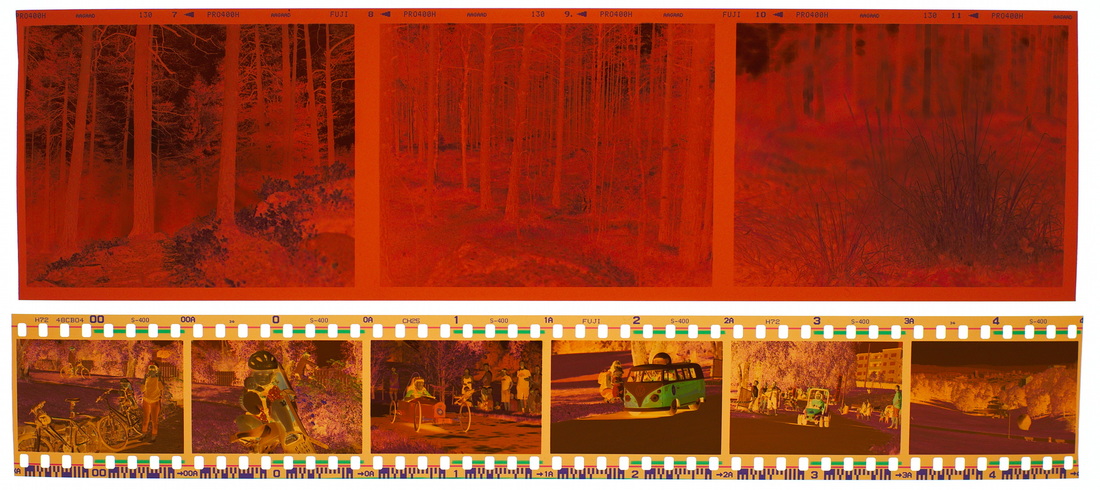
In order to further compare the results and figure out what kind of differences it make, I scanned the two strips together. It can be tricky to compare negatives by scanning them because the scanner or scanner software always applied some curves and corrections to the images. As far as I can tell, the only way to really make sure the exact same processing is applied to the two negatives is to scan them in a single image. This way, whatever the scanner or software applies to the images we are at least sure that the same is applies to the two things we want to compare. 
Picture
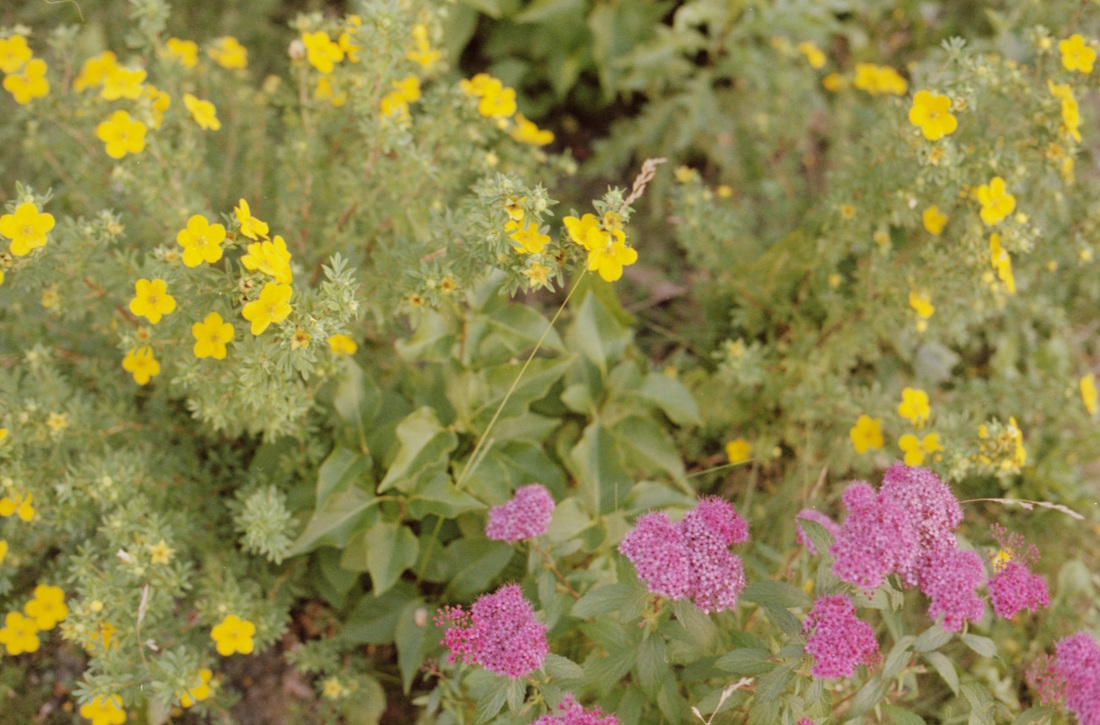
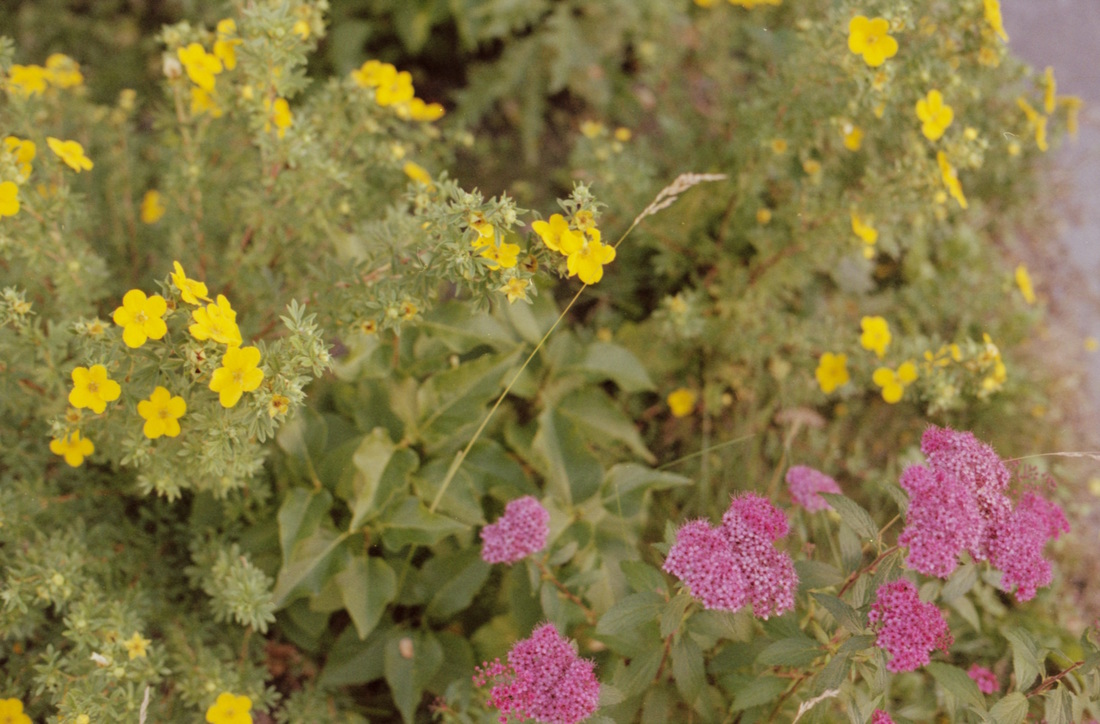
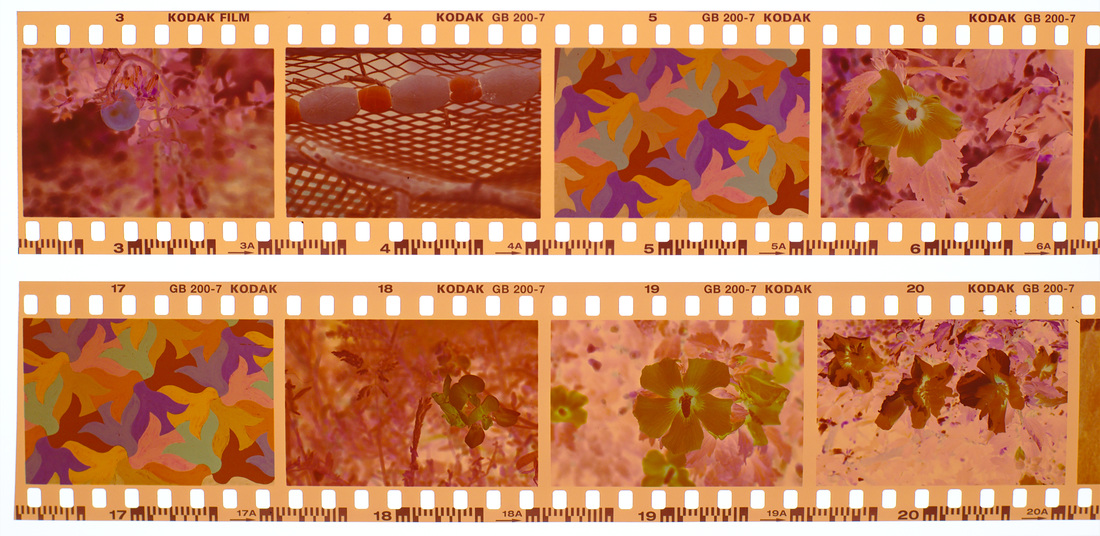
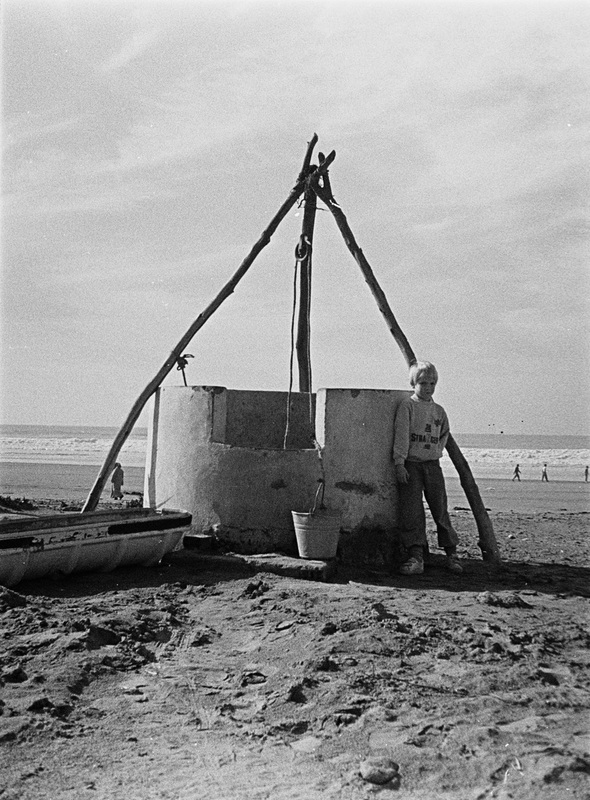
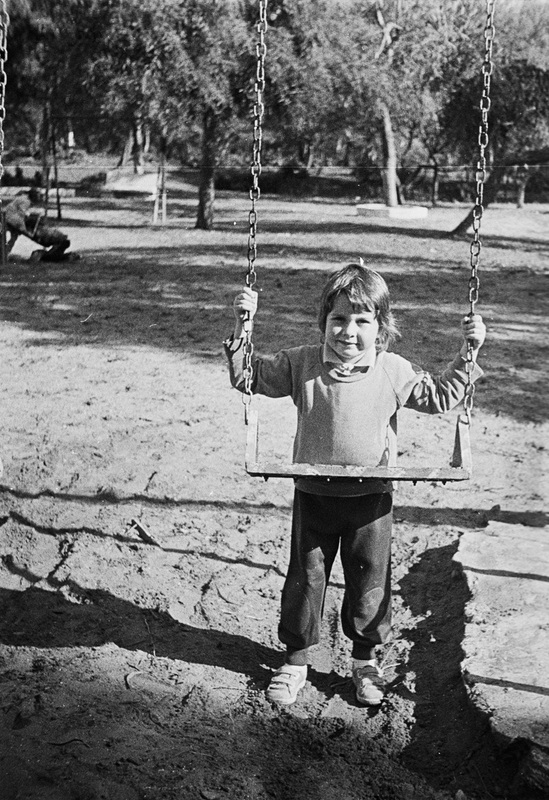
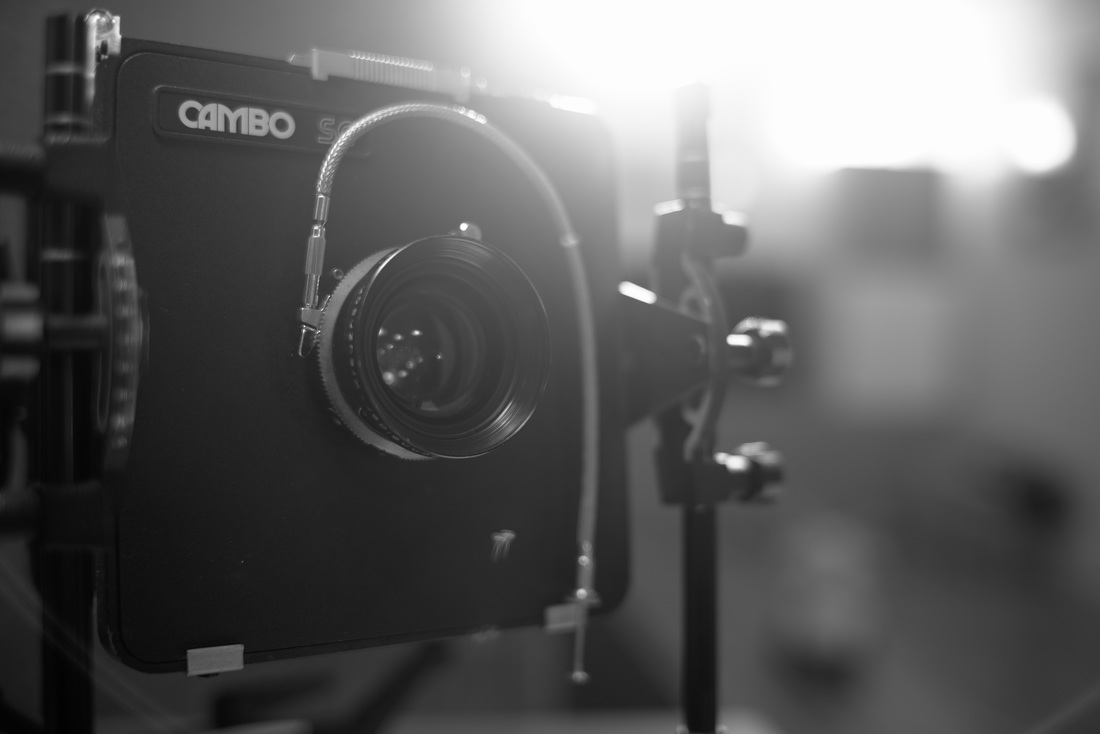
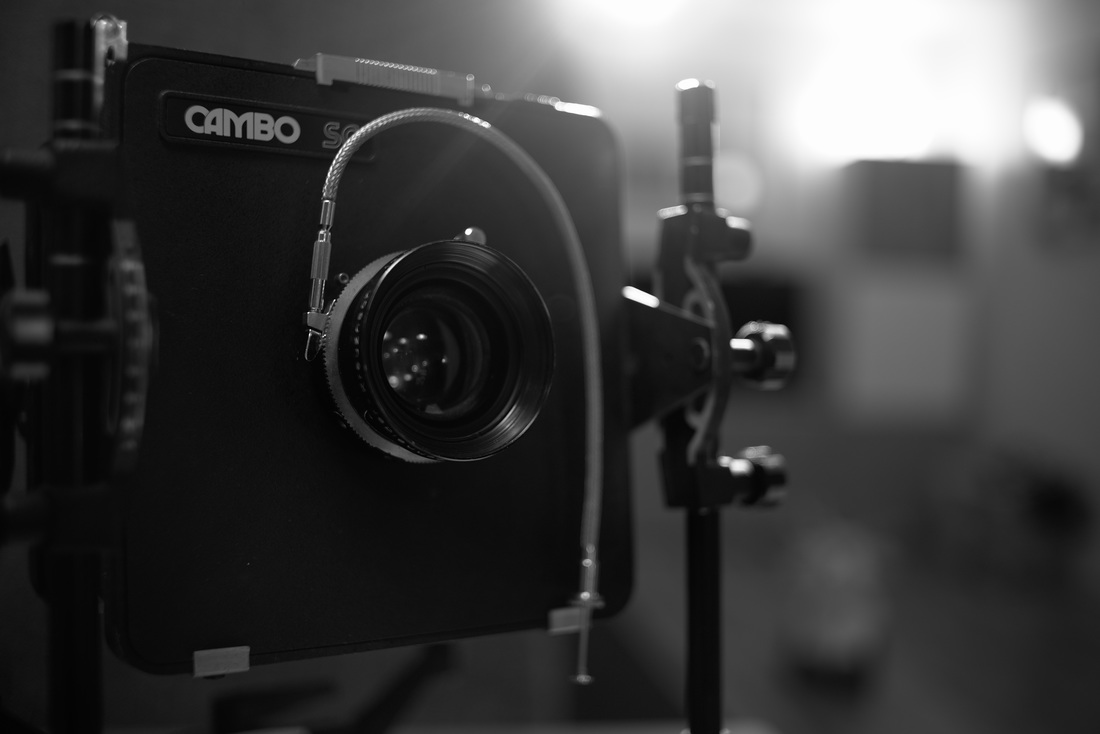
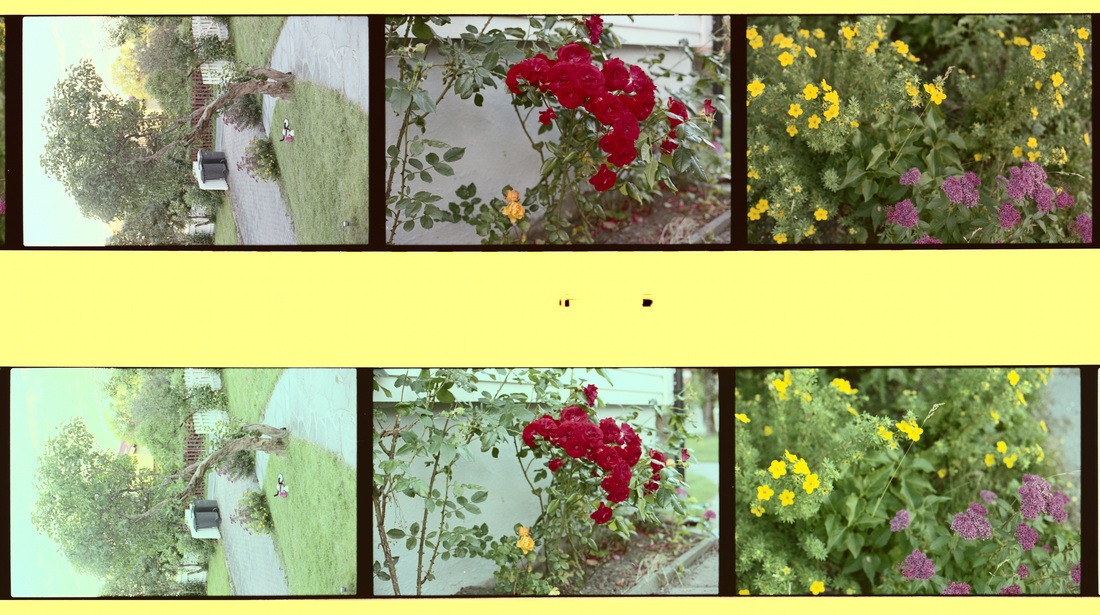
Single scan. White balance and exposure for the top strip.
Picture
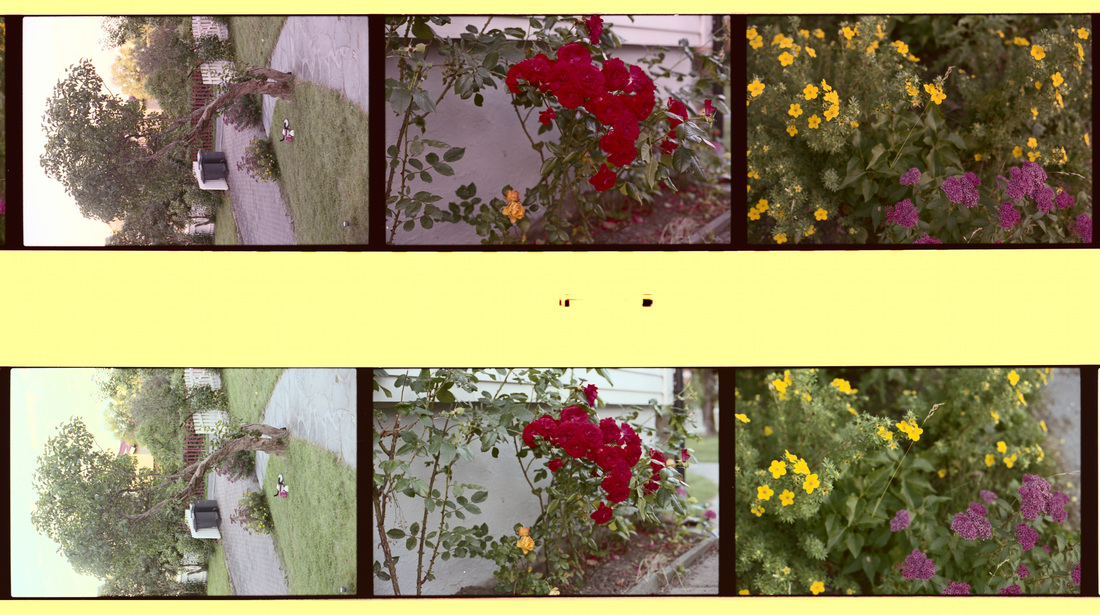
Single scan. White balance and exposure for the bottom strip.
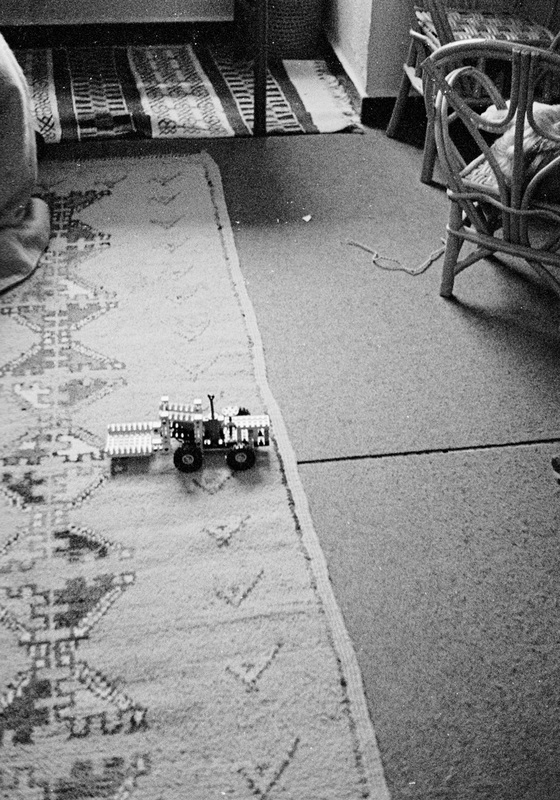
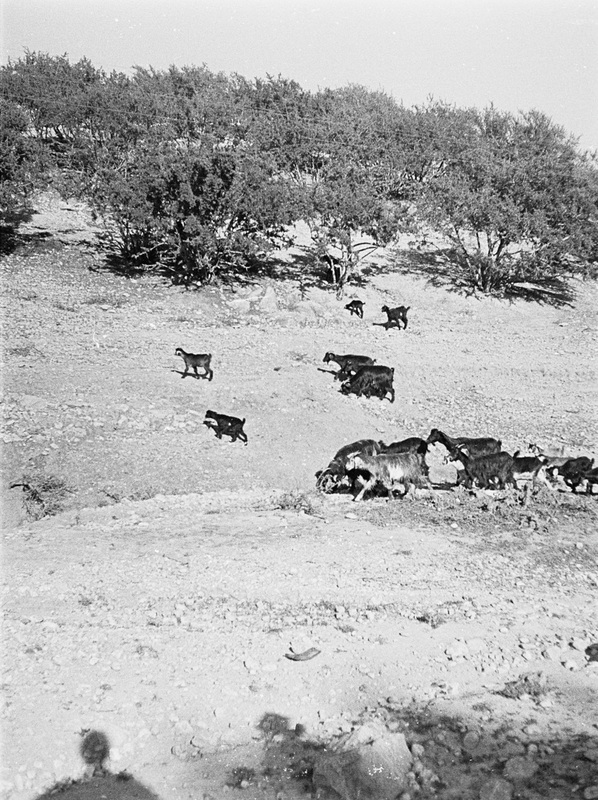
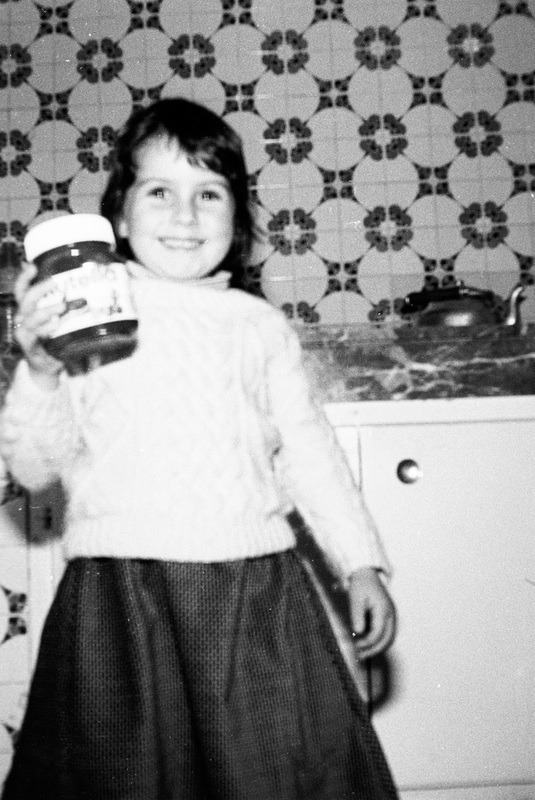
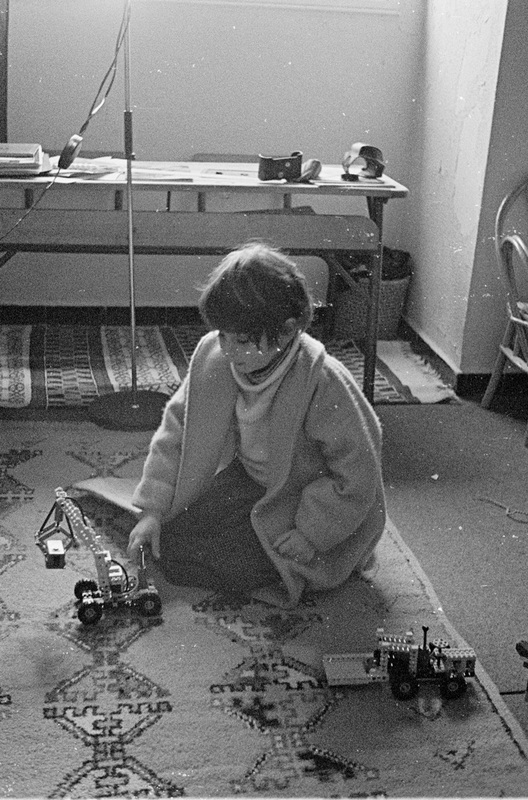
The two images above are the same scan but with the white balance and exposure adjusted for either the top or bottom strip. The adjustments are applied to the whole image in order to keep things comparable within each image. I did not try to make the image look especially good but just adjusted the white balance using the grey wall in the middle of the center image and then adjusted the exposure to get exactly the same grey on both strips. This allow to confirm that the bottom strip is brighter (as would be expected from the darker negative). It also shows that there is significantly different color cast on the two strip: when adjusted for the top strip, the bottom one has a cyan cast to it and when adjusted to the bottom one the top one has a red cast to it. This comparison cannot tell which is more "correct" than the other but there is clearly a big difference. 
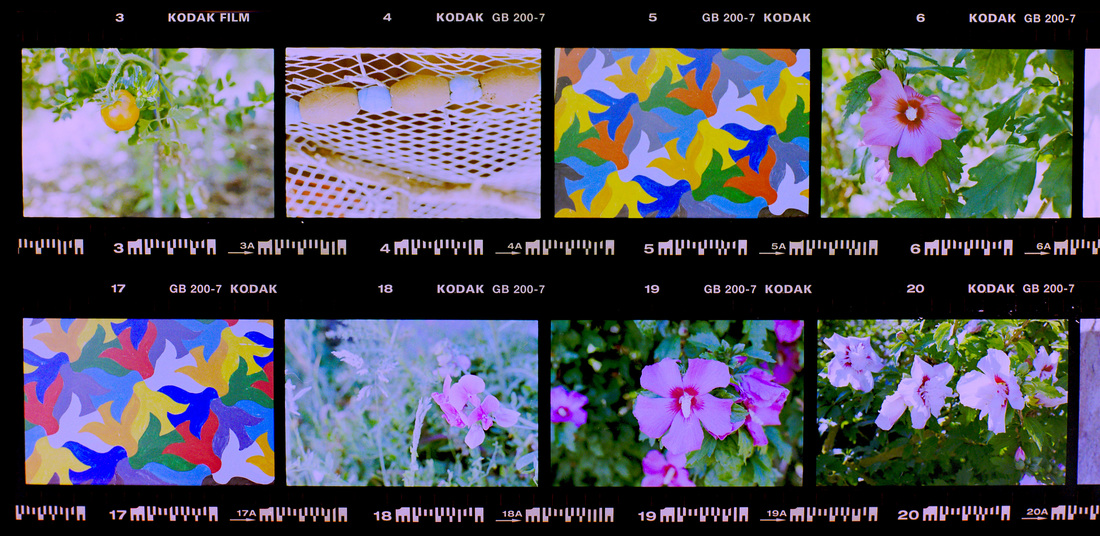
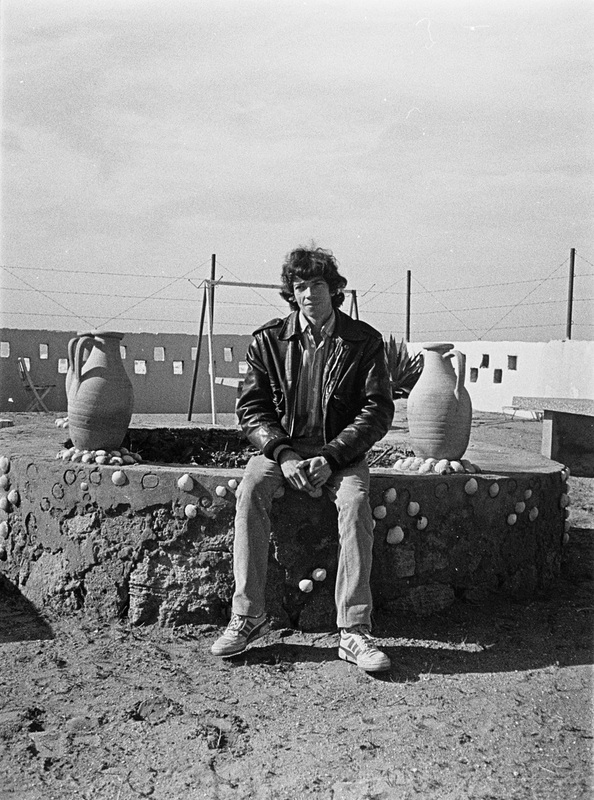
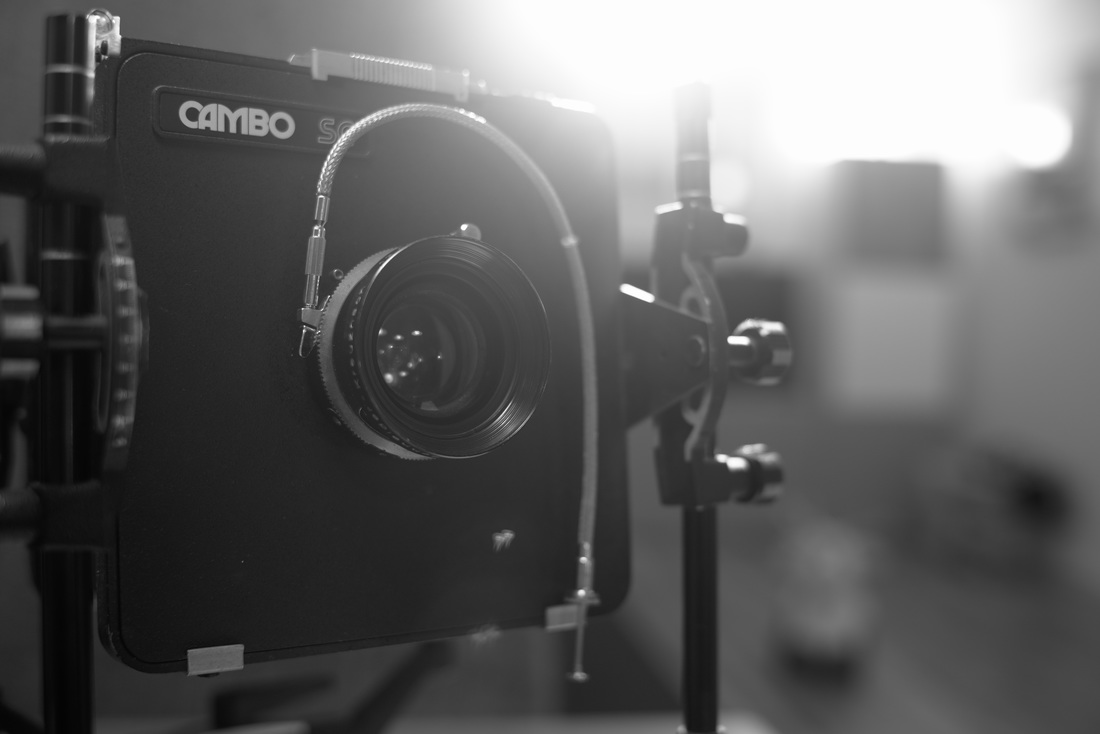
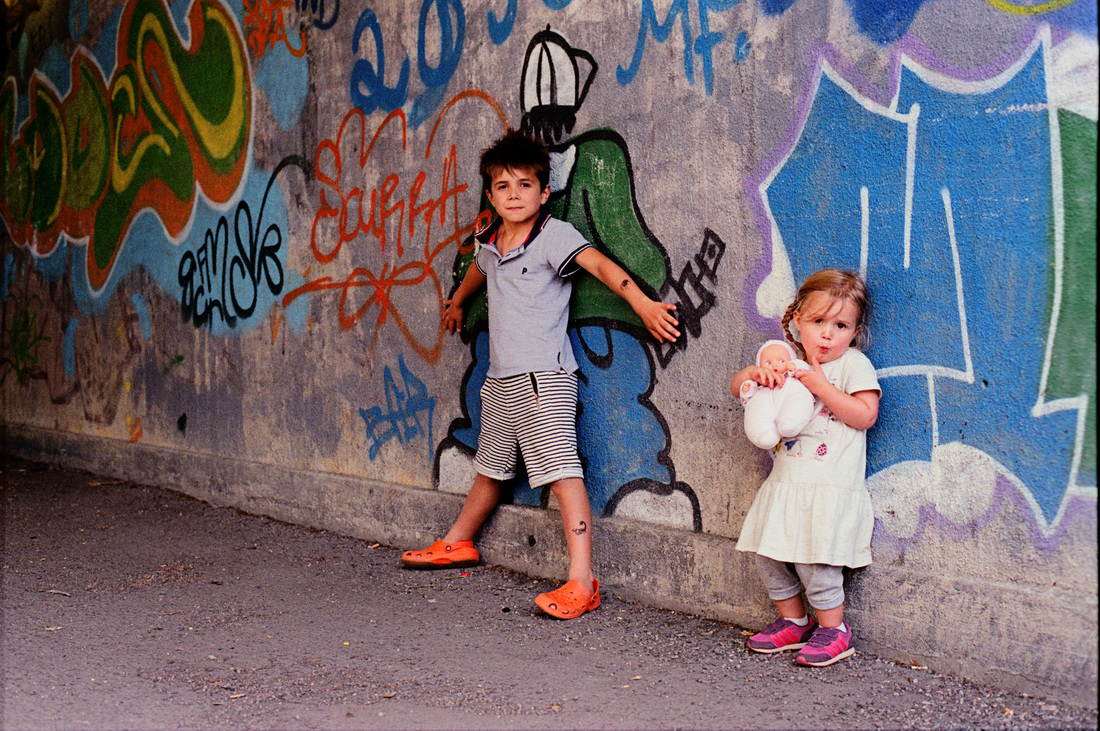
To try to see if one would look obviously "better" than the other I combined the two adjusted strip into a single image. I was careful when doing the adjustment to only change the white balance and the exposure. I used the grey wall in the middle of the center image to set both the white balance and the exposure. This way, if the two negative would have a big difference in contrast or saturation it would be visible.
​
​Looking at the results, the two set of images look pretty similar to me. Maybe the shadows look a bit brighter on the bottom strip. Maybe the highlights look a bit warmer on the top strip. But these are really small differences compared to the color balance and exposure which has been corrected. What do you think? Do you have a favorite? Do you see other differences which I have missed? 
Picture
Two strips adjusted *separately* to have the same white balance and exposure on the center grey wall. No adjustment beyond White balance and exposure.
It is not possible to fully conclude anything from this experiment but I really did not expect to see such a big difference. Is it all because of the processing temperature? Could it be because somehow I did not have the exact right temperature or time? At 30°C I have very very consistent results, all the differences I have ever seen are on the level of tiny differences, never such a big jump in color balance or exposure. I have to process more film at 38°C to see if I get the same consistency. If it is the case, I can then confirm that the big difference I observe here is really related to the temperature of the processing.
Note: One thing I was worried about was having uneven development when developing at 38°C because I have seen a couple of instance of people having the problem. On the piece of film I have developed there are no sign of any issues, that is reassuring. In terms of agitation, I used the stick for the first 10-15 sec and then 2 inversions every 30 sec.
fullresolution.zip
File Size: 16247 kb
File Type: zip
Download File

Conclusion

In terms of the time, the general rule of thumb is that bellow 5min is a bit short to be 100% consistent so I really prefer the longer times when developing at 30°C (8 min vs. 3"15 or 3"30 at 38°C). However, I was assuming that there was no big difference in the results. Ok, it is hard to define "big difference" but if I see the difference just looking at the negative on the light table, it is definitely a big difference!

To further investigate, as of now I am switching to processing my film at 38°C (at least for a while) to see if I notice any difference and how consistent are the results I get. I'll update the previous post with the 38°C process and times I will use.
3 Comments

Processing C-41 Color Negative Film

3/25/2016

4 Comments

 
A few examples of C-41 processed images
When I started shooting film again, I was mainly intending to do black and white because I knew I would be able to do all the processing and printing myself. However, it turns out that processing color negative film is quite easy as well. Printing is probably more tricky (and I do not have the equipment for it) but since I am scanning the film it is not an issue. Unlike for black and white film, there are not so many options for processing C-41 film and all film types are actually processed in a standard way (same chemicals, same times, same temperature, etc). That makes processing color film quite a bit simpler than black and white! In this post, I'll try to go through the process I use to develop C-41 and summarize the experiments I have made in order to get to that process. 
Context: (i) I am not processing high volumes (maybe one roll per week on average), (ii) I want to process the film as quickly as possible after shooting (I do not want to wait having 15 exposed rolls to develop them), (iii) I do not want to compromise image quality and (iv) I want to keep the cost of processing as low as possible (of course!).
When researching how to develop C-41, as always, there are a lot of contradictory advises and opinions regarding what temperature to use, what agitation, how long chemicals can be kept, whether or not doing a pre-wash or a final rinse, etc. For some aspects there is clear right and wrong, for some it depends on the context and for others it probably does not matter so much. This page summarize the process I use and try to explain and motivate why I am doing it this way. It is certainty not the only way to do it but I hope to converge to what is best suite for my particular context. I hope someone else finds this useful.

(My) C-41 Development Process

I am using Tetenal Colortec kits for C-41 development kit for color negative film. I have been using a couple of 1L versions of the kit but I am now using a 5L kit and mixing 1L at the time. The kit contains 3 chemicals in liquid concentrate form (Developer, Blix and a Stabilizer) and a set of instructions for mixing the chemicals and processing film. All my developing has been done with these chemicals but this is just because that is the one I could get my hands on. I have no idea how it compares with other kits but I expect that most of the points I am discussing here would apply more or less the same with other chemicals.
In addition to the supplied chemicals, I use a stop bath made of 2% acetic acid (diluted white vinegar). I re-use the same stop bath several times but change it when it starts to get yellowish/brownish because of being contaminated with developer.
Picture
Here is the development process I currently use:​
  1. Prepare a water bath at 30°C to bring all chemicals to temperature (Developer, Stop, Blix and Stabilizer).
  2. Load the film in the developing tank and put the tank in the 30°C bath as well for about 5 minutes.
  3. C-41 Developer at 30°C for 8'00" with agitation the first 15s (with twisting the stick) and 10s (3 inversions) every minute. Tap the tank and put it back in the 30°C water bath after every agitation. To account for the Developer being re-used and slightly diluted, after the 5th batch developed with the same 1L of developer, I increase the time to 9'00" instead of 8'00". I dispose of the chemistry after the 10th batch.
  4. Stop bath at 30°C for 0'30" with continuous agitation (with twisting the stick).
  5. Blix at 30°C for 6'00" with agitation the first 15s (with twisting the stick) and 10s (3 inversions) every minute. Tap the tank and put it back in the 30°C water bath after every agitation.
  6. "Ilford" wash with tap water at 30°C. 1 inversion + dump. 5 inversions + dump. 10 inversions + dump. 20 inversions + dump. 20 inversions, let it sit one minute + dump. Repeat the last if the wash water is not clear (with some film it is necessary).
  7. Stabilizer at 30°C for 1'00" with slow continuous agitation (with twisting the stick).
  8. Hang the film to dry. I do not use and squeegee but sometimes remove some of the liquid from the film by squeezing it between two fingers. I have not decided what the best strategy is as far as some possible drying marks vs some possible scratches but that is not specific to color negative film :-)
​So far, that is the process that I have come to and I get results which I am happy with. I believe that it is a good process for me or any body developing low volume manually. I would use a different strategy if doing higher volume or professional work. Bellow are the reasons / explanations / discussions / experiments for the different choices.

Temperature: why use 30°C instead of 38°C ? 

The recommendation from the instructions are to use a temperature of 38°C in a rotary processor. The times for processing are short which allow processing film quickly. However, in case of uneven development the instructions recommended to use lower temperature (30°C) and longer times. As far as I can tell, the only "disadvantage" of the lower temperature option is the longer time it takes to process film. The big advantages however are (i) not risk of uneven development even with manual agitation (ii) much easier to get accurate timings because of the longer times and (iii) easier to get a consistent 30°C temperature compare to 38°C (because it is closer to room temperature and cools off much slower). From this, unless developing with a rotary processor and in a big hurry (really ???) I would always choose the 30°C option and recommend using 30°C for developing C-41 "manually"
Picture
To bring the chemicals to temperature and keep the temperature correct, I use a large 10L water bath at 30°C and put all the chemicals and the developing tank in it at all times during the process. When using a Jobo processor, the automatic temperature control is very convenient and very precise but I do not have one at home and found that it is reasonably easy to keep within 1°C of the target temperature by using a thermometer and adding a bit of hot water once in a while. Technically, it is important to be very consistent and precise during the developer step but for the rest a couple of degrees up or down are not a problem at all (the instructions for the kit give some wide ranges of acceptable temperatures for the Blix and Stabilizer).
Note: I also have the intuition that an added benefit of using a lower temperature is that the chemicals do not react as much with the oxygen in the air when being used and may be reusable more times before going bad. However, I have no evidence of this. One clue is that the instructions give an option to develop at 45°C instead of 38°C but only if doing one-shot development (no reuse of the chemicals at all). 
UPDATE: Following the discussion on APUG, it seems that developing at 30°C has more impact on the development than just making the development time longer. It could result in negatives that are inferior in quality and harder to print / scan. See my next post here about an initial experiment at 38°C. I will develop at 38°C for a while and update this post as I go.

Agitation: Manual vs. Rotary Processor?

The instructions are written mainly for using a rotary processor so it is easy to jump to the conclusion that you need a processor for C-41, however, this is not the case at all. The thing is that when using 38°C the development is so quick that agitation needs to be perfect in order to get even negatives. This is not so much of a problem when using lower temperatures and longer times.

To check this, I made my own experiment and developed two pieces of the same film at the same time, using the same chemical and same 30°C temperature but one in the Jobo processor and the other one manually agitated with my usual agitation scheme of 15 sec twisting and 3 inversions every minutes. The picture on the right shows the result. The top 2 strips were developed with the Jobo processor (continuous agitation) and the two strips on the bottom were developed with manual agitation (15 second of twisting and then 3 inversions every minutes).
​
The pictures on this test roll are not exactly the same so it is hard to compare very small variations. Overall the density of the negative are really really close. 
Picture
Jobo Processor (top 2) vs. Manual Agitation (bottom 2)
Maybe the top 2 strips are ever so slightly darker (for example when comparing the marking along the edge of the film) but there is not big difference.  I was initially wondering if I should increase a bit the time when developing with manual agitation but given this result I decided not to and stick with the recommended times (i.e. 8 minutes of development at 30°C). In the end I now always manually agitate the film. When I have the Jobo, I use it for the temperature controlled water bath but I use my Patterson tanks and agitate manually. After all, it is part of the enjoyment of shooting film :-)

With or Without pre-wash / pre-soak?

The benefits of a pre-wash are (i) to get the tank and film at the right temperature before adding the developer and (ii) wash the anti-halation layer of the film (or any other coating) if the film has one. When developing black and white with one-shot developer I typically do a pre-wash for 120 film which has an anti-halation layer. For C-41 I am not sure which films have  anti-halation layers. The disadvantages with doing a pre-wash are (i) it is an extra step and (ii) the small amount of water left on the film and in the tank when pouring the developers slightly dilutes the developer. I would not mind the extra step but the dilution can really become an issue when reusing the developer over and over again.

I was a bit skeptic about the dilution issue at first but with a little experiment and calculation, I am now convinced and that is the reason why I do not pre-wash when developing C-41 film. To know how much the developer is potentially diluted a simple experiment of measuring how much of the pre-wash water actually comes out allows to estimate what is left on the film and in the tank. For 500mL of water poured in my tank containing either 1 roll of 120 or two rolls of 35mm, only between 475mL and 490mL come out of the tank. That means that between 10mL and 25mL are left on the film. When adding the developer, this small amount of water gets  mixed with it. If using a one shot developer or using you 1L in 2 or 3 development batches, the effect of this dilution is quite negligible but I intend to reuse my 1L of developer for 10 batches or mores! that means that in the end a total of between 100mL and 250mL (!!!) of water ends-up being added to the developer. That is really significant and would for sure lower the developer concentration enough to affect the results.

Remark: Some recommend the pre-soak to make sure that the developer spreads more evenly and avoids bubbling on the film. While this may have been true at some point in history and with some specific films, I really haven't seen anyone reporting issues with bubbles or uneven development when doing a normal initial agitation and taping the tank to dislodge bubbles directly with the developer so I am not including it as a benefit here.

Why use a Stop bath?

The reason for using a stop bath is to avoid contaminating the Blix with too much developer. As explained in the previous paragraph, there is always some amount of liquid left in the tank when emptying it from the previous chemical. My estimation for a 600mL tank is that between 10mL to 25mL is typically left on the film and in the tank. That means that if the Blix is used right after the developer, it is contaminated by 10mL to 25mL of developer for every batch. That may be negligible if you are only reusing it 2 or 3 times but after 10 batches, that is more than 100mL of developer in the Blix and that would certainly create problems.

The stop bath I use is 2% acetic acid (i.e. diluted vinegar) it helps get the developer off the film and greatly dilutes and neutralizes the developer left in the tank. Of course when pouring out the stop bath, 10mL to 25mL remain in the tank and ends-up diluting/contaminating  the Blix but the acid of the stop bath is not as bad for the Blix as the alkaline developer would be. Based on this, I believe that it is very important to use a stop bath if you intend to re-use you chemicals for many batches.
​
I make my Stop bath by diluting white vinegar to 2%. In the shops the typical kitchen white vinegar is 7% or 8% but I also found some around 30%. Typically, I make a new stop bath solution every 4 or 5 batches or whenever it starts to have a brownish tint to it. The reason I use vinegar is just because it is cheap and widely available but any stop bath would do. In terms of preserving the Blix, using plain water as the stop bath would do the job almost as good but at least in theory the acid of the stop bath helps to neutralize the developer.

No wash / rinse after the Stabilizer!

This is one for which there should not be any debate. The point of the Stabilizer is to be used as the final rinse! It contains a wetting agent which avoid drying marks on the film and some chemicals to "stabilize" the film (whatever that means) and prevent any mold or other parasites to develop on the film later. It has to be the last thing on your film before you hang it to dry. You should not wash after the stabilizer.

You may choose to replace the stabilizer by another wetting agent (for example Photo-Flo) but in that case there is no point in using the Stabalizer before since you are just washing it away and with it all its potential benefits. From my understanding in short term you will not see any differences but in the long term (after many years) color negative film is prone to mold growing on/in it and that is what the Stabalizer prevents in addition to being a wetting agent. That is why I use the Stabilizer for C-41 and not Photo-Flo which I use for black and white film.

Remark: In case Stabilizer leaves drying marks on the film, one option seem to be to add some Photo-Flo to it. I have not had any problems with drying marks so I have not tried. I believe that the Stabilizer (at the the one I am using) already contains a wetting agent but I am not 100% sure and maybe in some case it helps to add more.

Example usage log for a Colortec C-41 1L kit

In order to figure out how much I could reuse the chemistry and how long I could keep it, I logged how I used a single 1L kit. Bellow are the dates and film I processed with that kit.
  • ## (18/08): Chemicals prepared.
  • #1 (19/08): 1 x 35mm Kodak ColorPlus 200 + Test strip #1
  • #2 (20/08): 1 x 35mm Kodak ColorPlus 200 + 1 x 35mm Fuji Superia 400
  • #3 (23/08): 1 x 35mm Kodak Portra 400 + 1 x 35mm Kodak Ektar 100
  • #4 (28/08): 1 x 35mm Kodak ColorPlus 200 + 1 x 35mm Fuji Superia 400
  • #5 (25/09): 1 x 35mm Kodak ColorPlus 200
  • #6 (16/10): 1 x 35mm Kodak Gold 200
  • #7 (17/10): 1 x 120 Expired Fujicolor Pro 400H
  • #8 (08/11): 1 x 120 Kodak Ektar 100 + 1 x 120 Expired Kodak Portra 160
  • #9 (15/11): 1 x 120 Kodak New Portra 400
  • #10 (19/12): 1 x 35mm Expired Fuji Superia 400 + Test strip #2
  • ##  (19/12): Chemicals disposed.
Total: 14 rolls in 10 batches (10 x 35mm + 4 x 120)
Picture
Bottom strip is from batch #1. Top strip is from batch #10. No visible difference on the negatives.
In order to evaluate the quality of the processing, I used one of my test roll of film which contains many times the same sequence of 3 pictures and developed a small strip together with the first batch and with the last batch. To the right are the two strips next to each others on the light table. The top strip was processed with batch #10 while the bottom one was processed with batch #1. By just looking at the negative, there is no way to tell any difference between the two. To investigate a bit further, I scanned the images in RAW and applied exactly the same level adjustments to all of them. Bellow are the 6 images that were scanned. Definitely not pretty pictures but I just wanted to have some colors, shadows and highlights on these test shots in order to see if there would be any obvious differences. 
The results show that the pictures from batch #10 are a tiny tiny bit darker than those of batch #1 but nothing that would really be noticeable (and could be due to other things than just the age of the chemistry). I disposed of the chemicals and started with fresh ones of the this batch but I probably could have developed more rolls... 

​Conclusion: This experiment shows that in this case, I was able to process 14 rolls of film, in 10 batches distributed over 4 month and that there was no measurable difference in processing quality between the first and last roll that was developed. Keep in mind that this is of course just one example.

How long and how much the chemistry can be reused?

That is the hardest question and the only correct answer is that it depends. According to the instruction of the C-41 kit, the unopened concentrate are good for a couple of years the opened concentrates can be kept for 3 to 6 months and the mixed chemicals for 6 weeks for the developer and 6 month for the blix and Stabilizer. I believe that these are quite conservative numbers but it gives a good indication that the most delicate chemical is the developer.  In terms of the number of rolls which can be processed, the instruction recommend 12 to 16 rolls (35mm or 120) depending on film sensitivity (12 for film over ISO400 and 16 for film under ISO400). I typically process a mix of ISO 100 to 400 film so the chemistry should be good for 15 rolls without problems.

In terms of the number of batches, the instructions are not very specific but mention a maximum of 3 batches when processing film over ISO 400. That probably means that 5 or 6 batches can be recommended with film under ISO400. The number of batches is really something I want to be able to stretch because (i) I want to develop film as I shoot it and (ii) my biggest developing tank can only hold 2 rolls of 120 or 3 rolls of 35mm.

In summary, here is what I currently do:
  • Change my chemicals after 5 month / 15 rolls / 10 batches whichever comes first.
  • Test my chemistry whenever I have doubts or need to develop an "important" roll of film.

How to test if the chemistry?

The only way to make sure the Developer and Blix are still good is to test them. The stop bath is very cheap so I change it whenever it starts to be too tinted. The Stabilizer should be good for a very long time so there is no need to worry about it (unless it can have been contaminated by some other chemicals). There are two ways I use to test the chemicals: and quick and dirty one and a proper one which takes quite some time. The quick and dirty use the film leader and allows making sure that the developer and blix are not completely dead and that some sort of images will be developed. It does not allow to ensure that the chemistry is good enough to get good quality images. The proper one consist of developing a test piece of film and compare the results with a control. It is time consuming but really the only way to be sure that the developer and blix are fully functional.
Quick and Dirty: Dip half the film leader in developer and let the developer sit on the film for 2 or 3 minutes. Rinse with water. Dip the whole film leader in blix and leave it in blix for 1 or 2 minutes. Rinse with water. As a result, the film leader should be clear for the part that has not been in the developer and dark where it has been in developer. If the result is different, for example all clear, all dark or no clear difference between the two parts, it means that you chemistry is completely dead. In case you get the expected pattern, it does not mean that your chemistry is good but at least it is guarantied that you will get some sort of images. I do not think that we can test more than that using the film leader.
Proper Test: This is quite simple but more time consuming. The idea is to develop a piece of film and compare it with a control. The important part to be able to do that is to actually have a piece of film and a control which are comparable, that requires a bit of planning up-front. For that, you have to shoot a test roll of film. What I do is that I shoot a whole roll of film with the same sequence of 3 or 4 pictures. What is important is to make sure that the pictures are about the same across the whole roll and that the same pictures are shot with the same settings. This is to make sure that images are fully comparable. In terms of the pictures themselves, I try to make sure that there is a good selection of different bright colors and both some shadows and highlights. Once you have this test roll, the idea is to develop a small section of it with your first batch, right after mixing you chemistry. This is going to be the control. Later, whenever you are unsure or want to get a good test of your chemistry, you can develop another small section of the test roll and compare it with the control. I would really encourage you to make this test roll and control right away if you are starting, it is a very good tool to have later if you want to make sure you have perfect images quality and not through away perfectly good chemistry. It is not a very expensive investment and can allow you to reuse the chemistry over and over again without taking any risks.
Bellow is an example of what you can get. This test was done on chemistry mixed 7 month before and developing 11 rolls of film. The results shows that the density of the negatives are pretty similar but some defects starts to show. If you look at the colors on the positive image on the right, it seems that the yellows are fading away on the bottom strip compared to the top. On this test roll I was not very consistent in taking exactly the same pictures but a difference is clearly visible between picture #3 on top and picture #1 in the bottom and also picture #4 on tom and picture #3 on the bottom. In that case I was testing an old batch of chemistry to know if it would be good enough to process a 25 year old roll of exposed film which I found in the attic. I was really not sure if there were any pictures at all on that roll and how good they would be. After this test, I decided to go ahead and develop despite the small color shift and I got some pictures of me as a kid :-).
Picture
Top strip is the control. Bottom strip developed after having the chemistry mixed for 7 months and developing 11 rolls of film.
Picture
Top strip is the control. Bottom strip developed after having the chemistry mixed for 7 months and developing 11 rolls of film.
Another example of a test don with another test roll and for another batch of chemistry can be seen in the section "Example usage log for a Colortec C-41 1L kit" above.

Conclusion

Processing C-41 is easy and reasonably cheap. The process described here typically allows me to process an average 12 rolls per liter of of chemistry. The last I bought is a 5L kit. I hope that the concentrate will keep long enough and not go bad before I can use it. time will tell! I hope you have found some useful information on this page and do no hesitate to leave me comments questions or suggestions! 

Links

When googling for self developing C-41 many many forum posts, tutorials and review come up. Many of them just basically repeat the instruction manual of a specific kit or contain one process without much explanations. Bellow are a few links to the ones which I have found the most useful when getting started and elaborating my own process.
  • TETENAL C-41 Rapid Negative Kit Review: Experiments showing the differences in the results obtained when developing with manual agitation at 38°C and  30°C. This review is the reason I went for 30°C right away.
  • Home Processing of C-41 Color Negative Film: Some good description of the development process step by step. And a discussion on adding FotoFlo directly in the Stabilizer if you experience drying mark. The article claims that the Stabilizer does not contains a wetting agent. My impression is that the one I am using contains one and I have not experiences any troubles with drying marks but that may be something to keep in mind.

To get a better feeling of the process, there are also quite a few videos on Youtube from start to finish. Here are a couple which I have watched before getting started
  • Developing Color Film (C41) by The Art of Photography: Shows the process of developing with manual agitation and a simple water bath to keep temperatures.
  • How To: Develop Color Print Film (C-41 Process) by ForesthillFilmLab: Processing C-41 with a Jobo processor.
  • Color Film Processing by The Rescued Film Project: Processing hundreds of rolls manually !!!
4 Comments

A few Snapshots in Oslo

3/18/2016

1 Comment

 
Here are a few pictures of the city center of Oslo taken while walking around with the family on Saturday. I had the Nikon FM3A and Ilford HP5+ film. As a lens, I usually either take the 50mm f/1.4 or the 35mm f/2 but I wanted to test a 28mm f/2.8. The lens is in good condition but there is a little fungus on one of the internal element. I do not think that it affects the images much but I'll probably have to clean it at some point. Annyway, as a wide angle lens I have used the 24mm f/2.8 quite a lot but I want to try something between the 24mm and the 35mm to see how it works for me. I addition to the 28mm, I also took the 105mm f/2.5 to have a longer lens (the 105mm is one of my favorite Nikkor lens, the image quality often surprises me).
Picture
Above is a shot of the Royal Palace (Det Kongelige Slott) as seen through Karl Johans gate from the Norwegian Parliament (Stortinget) on the left. This is kind a a classic shot of Oslo but I wanted to try to get somthing like it with the 105mm lens. I am quite happy with the way it turned out. Bellow are a couple of shots of the Oslo Tram (Trikken) in two streets. Shot with the 28mm lens.
Picture
Picture
Bellow are a couple more shots with the 105mm lens. The Royal Palace on the left and Karl Johans gate on the right.
Picture
Picture
An finally bellow are a few random shots with both lenses.
Overall, this seem to be a good combination of lenses. Add the 50mm f/1.4 and it may be all I will even need. It is hard to judge if the little fungus in the 28mm has any impact on the images, I have not notices anything but of course Ilford HP5+ 400 is quite grainy and not so high resolution.
1 Comment

Olympus Pen EES-2: My very first camera!

2/22/2016

1 Comment

 
Picture
This is the actual first camera I ever used, I have been looking for it for a good while and finally found it deep in the attic. Apparently when I was about 5 or 6 years old I of course wanted to take pictures just like my father. He found this camera as a relatively easy to use, tough and economical model which he dared to put in my hands. I do not remember shooting it when I was 5 or 6 but I found some of the negatives. I remember very well using it when I was 10 so it looks like I actually used it for a good while. 
The most remarkable feature of this camera (as the others of the  Olympus Pen EES series) is that it is a half-frame camera: it shoots two pictures on a typical 35mm frame and thus allows for 72 exposures on a typical 36 exposures roll! That means that the cost per picture is half what it would be with a full frame 35mm camera. Of course there is a trade-off in term of images quality.
It is easy to use thanks to the automatic mode which uses the selenium meter to choose both the aperture and the shutter speed. It has two shutter speeds: a slow on of around 1/30s or 1/40s and a fast one of around 1/200s. The lens is a 30mm f/2.8. Given that it is a half frame camera, 30mm is quite normal focal length. The f/2.8 maximum aperture is quite fast. The focusing is done in 4 zones: portrait, 2 persons, a group of persons and infinity. Bellow are some picture of the camera.
Here are a few picture taken in 1986. Most of them have been taken by me except the first one which is a picture of me :-)
And now for a test to see if the camera still works. When I found it in the attic, it was in its original soft case. The case was not in good condition, falling apart and most likely with fungus all over it. I took the camera out and through away the case. The camera itself looked pretty good, I just gave it a wipe and blow some air on the lens to remove dust. Inside, the light seals do not look too good and will probably need replacing at some point, that is really the only thing. Some quick testing seems to indicate that the light meter is still functional and prevents taking underexposed pictures by showing a little red flag in the viewfinder whenever there is not enough light. I put a roll of Ilford HP5+ 400 in it and set the ISO dial to 400. I would have liked to set it to 1600 but 400 is the maximum. Using a 24 exposure roll, I got 48 pictures! Here are a few of them:
This little Olympus seem to still work just fine! The meter seems pretty ok and all the picture came with a pretty good exposure. I took some shots indoors and outdoors in various lighting conditions. I also took a few picture using a strobe connected to the PC sync port but a couple of times the flash did not fire. I'll have to check and maybe clean some contacts. Apart from that last 10 pictures of the roll came out severely underexposed but I cannot blame the meter... I just forgot to set the camera to auto after shooting with the strobe and just left it on f/8 or something like that. This is definitely a fun camera to use and the portrait orientation is interesting. The only thing which is a bit hard is to get the focus right especially in low light with wide apertures. Quite a few shots (including some of the examples above) are not quite in focus.
1 Comment

Hasselblad 500C

1/27/2016

0 Comments

 
Today I got a Hasselblad 500C (I'll take better pictures of it when I have some time). Here is all the info about it before I forget! It is a late transitional 500C model which was built in 1970 and has "all" the features of a 500C/M, i.e. interchangeable focusing screens. It came with two different focusing screens, the original one and a brighter more recent "Acute Matte with crosshair" (model #42165). It also came with a recent folding focusing hood (model #42315). The camera has been serviced by Hasselblad (in Göteborg) in 2012 and the rear shutter and the mirror mechanism has been replaced. The film back is an A12 back built in 1989, light seals were ok a couple of years ago but probably worth checking at some point. The lens I got with it is a Hasselblad 150mm f/4 C lens in its original "bubble" case.
Picture

First test with a roll of film!

For a first test, I just shot a test roll with it using a roll of Ilford HP5+ film which expired in 2005 (10 years ago!). I have shot film from the same box before and I typically shoot it at 200 instead of 400 and develop it normally. That kind of "compensate" for the expiration. The goal for this test is just to get some pictures to make sure the camera works and that I am loading and handling it properly. Since there is no much light, I needed to use a strobe to be able to shoot at 200 and I was not sure if I would be able to sync it properly. After a few tests looking though the lens (without the film back), it looks like using the sync port on the lens in X mode works fine so that is what I used. ​Using the sync port on the body also gets the strobe to fire but not at the right time, it is probably only meant to be used with slow shutter speeds, I'll have to check. Anyway, for this test, I did it very simple and setup a soft-box on the strobe and used a dark grey background. I metered with my digital camera and got an aperture of f/5.6 at ISO 200. For the shutter speed I used 1/250s.
The film is now drying and it look like I have got 12 exposures. I am a bit unsure if the pictures are going to be in focus but in terms of exposure the negative looks consistent across the 12 frames. That mean that the flash sync at 1/250s seems to work just fine (normally it should work at all shutter speed and up to 1/500s). In terms of focusing, it was pretty easy to focus on the eyes whenever I could see a catch light but my model was not very cooperative and not standing still for more than a few unpredictable seconds. I did not do the math before shooting but now, looking at a depth of field calculator, at f/5,6 with 150mm at about 2 meters, I get a DoF of 10cm only... If I had calculated that before I would probably have cranked the light up to shoot at f/8 or f/11 which would giver respectively about 15 and 20cm of DoF. We will see if I managed to get any sharp pictures!
Above are the 12 pictures I got. I scanned them in "RAW" and the applied the same basic levels adjustments to all of them. The image quality is not so good and there is some visible dust and grain but that is just because the film is severely expired which makes for some negatives with low contrast. Apart from that focusing does not seem to be so bad even if some of the pictures are off (I blame the model for that).

Result of the first test

​Looking closer at the images, the only problem I cannot really explain is that 3 of the images (#5, #10 and #11) have a sort of ghost image which is visible along the edge of the white shirt. At 1/250s should have been high enough to cut the ambient light (including the modelling light) and eliminate any movement. I have seen similar results when shooting with the strobe (and modelling light on) when using the Pentax 6x7 which has a sync speed of 1/30s only. I will have to further test the shutter to make sure it not slower than it seems (the lens was not used for the last 2 or 3 years). It is only visible on 3 of the pictures so maybe it is an intermittent problem but it could also be that those 3 pictures were the ones with significant movement, I am not sure.
I looked again at the camera trying to figure out if it could be the shutter in the lens which was too slow. It does not seem so and the shutter sounds about right. It may not be perfect (I would have to do some measurements for that) but it really does not seem that 1/250 would be 2 or 3 stops slower. However, while testing I think that I have found the real issue. Sometimes when firing the shutter, the rear doors open before the lens shutter is closed. This means that in those cases the film is indeed exposed twice! This does not happen all the time but when it happens it typically does it a few times in a row. I have tested using the pre-release button and sure enough, once in a while the rear doors open while the shutter is closing.
I have also noticed that when I press the shutter release all the way in, sometimes the shutter does not fire. The rear doors opens normally with the shutter closed (or or sometime closing) but it is only when I slightly let go of the shutter release button that the shutter fires. If I press the shutter slowly, then the shutter seem to fire as it should (but sometimes there is still the problem that the rear doors open before the shutter is closed).
This seem to be a more serious problem than a slow or sticky shutter in the lens. I have no idea if this could be a fault in the body or if it is a problem with the lens shutter. Both? Hopefully not! :-) 

Second test with a different lens

To get a better idea of where the problem comes from, I tested the body with another lens (and 80mm F/2.8 Plannar). Without film I can clearly see the difference. With the 150mm lens, when using the pre-release, I can clearly see the shutter closing in the lens after the back doors have opened. With other lenses, this never happens. I have tested with an 80mm and with a 250mm and no metter how many tests I make, the shutter is always closed before the back opens. When I put back the 150mm the problem is clearly visible. My guess is that the reason is that the shutter is somehow a bit sticky. It does not seem to affect the shutter speed that much but it clearly retards the closing of the shutter before it is released. Not too sure what to do about it... it seems that the fix is beyond DIY and service could be very expensive. We will see! Anyway, since the 80mm worked, I shot a second test roll with it, here are a few pictures (Same setup and expired film as the first roll but with a black background and the 80mm lens).

Conclusion

After the second test and a lot of testing with different lenses and without film, it seems that the camera is working perfectly as it should. So far I have not noticed any issues with the film back either, it works smoothly and there are no signs of any light leaks (I have not been shooting in bright daylight because there is no bright daylight these days). However, the 150mm f4 Sonnar lens has a faulty shutter. Knowing it, I could use it if on a tripod by putting the lens cap on, hitting the pre-release, removing the lens cap and then firing the shutter. This could work for some landscape shots but for any portrait this is not realistic. I'll have to find a way to fix it or to have it fixed!
0 Comments

Kodak Gold in the Forest

1/9/2016

1 Comment

 
Another walk in the forest, this time with the Nikon F3, a Nikkor 35mm f/2 lens and a roll of Kodak Gold 200 film. I would have likes to use the Pentax 6x7 but it is definitely too cold for it now (bellow 0°C the mirror often get stuck when firing the shutter which is really annoying!). The Nikon F3 on the other hand seems 100% reliable and any conditions, I have never had any issues with it. For this roll of film I chose it over the FM3 because I assume it is a bit tougher and it is better for long exposures (shutter speed goes down to 8 sec instead of 1 sec for the FM3, it has a mirror lock-up and a reliable timer). In terms of metering however I had not used the F3 for a while and I really do not like the LCD meter, the needle in the FM / FM3 is so much better!!! In addition, the meter in the F3 is totally unusable in the dark. There is a small light to light up the LCD but the button to turn it on is hard to impossible to push, especially when wearing gloves! I ended up several times using my digital camera for metering. Anyway, here are a few pictures I got.
1 Comment

Comparing Nikkor 35mm f/1.4 and f/2 lenses

11/28/2015

0 Comments

 
There is not so much light in Norway at this time of the year so fast primes (in addition to push processing) are pretty much needed any time no flash is used. I have typically been using 50mm lenses (f/1.8 or f/1.4) but I often feel that I would like a slightly wider field of view so these days I am using my 35mm lenses as my default daily lens and I quite like it. I have both the Nikon Nikkor 35mm f/1.4 AI-s and the Nikon 35mm f/2 AI-s, lets compare them a bit to see which I should use. The pictures bellow show the f/1.4 on the left and the f/2 on the right.
The size and weight difference between the two is quite significant since the f/1.4 had significantly more glass. Both are quite old and in used condition but the glass is nice and clean.
The f/1.4 has a few specks of dust inside but probably not anything which could affect the pictures. I did some quick tests when I got the lens and confirmed the general opinion that it is not so good at f/1.4. The sharpness is poor across the frame and it has a lot of vignetting. From f/2 it is much better so in practice I almost never shoot it at f/1.4.  
The f/2 is in marginally better condition but has also seen some use. It is much lighter and easier to use. It is about the same size at a 50mm which makes it very convinient to carry around. It is the challenger, if it perfoms, I am considering using it instead of the f/1.4.
Here are some simple test shots with both lenses at different apertures. I am not really looking for what lens is the sharpest here but more at the overall contrast and image quality they provide in a challenging backlit scene.   

Conclusion

On the simple test above, the 35mm f/2 seem to give better contrast were the images from the 35mm f/1.4 is a bit washed out. I do not know how this translate when it come to 'real' images since this test is quite special and has a lot of flare which can explain the lost of contrast. I'll have to test with other images.  The size difference between the two is quite significant and since the 35mm f/1.4 is not that good at f/1.4, I am considering getting rid of it if the f/2 is on par from f/2 and up. Bellow are a few pictures shot with the 35mm f/2.
0 Comments

Lenses for the Pentax 6x7

11/22/2015

1 Comment

 
I have 4 lenses which I can use with the Pentax 6x7. I have a 90mm f/2.8 normal lens, a 45mm f/4 wide angle and two telephoto lenses 135mm f/4 and 200 f/4. Bellow are my notes on those different lenses based on  information I could find about them as well as my experience with them. I also include a few sample pictures taken with the different lenses.
The SUPER-TAKUMAR / 6x7 1:4 / 200mm was released in 1969 (see pentaxforum.com). It seems to have a quite good reputation in terms of sharpness, bokeh and durability. I can confirm the durability since we are in 2015 and the one I have is still fully functional with a smooth focusing ring. That is quite impressive considering its age and the fact that it has not been serviced recently (at least within the last 20 years). Interestingly, it seems to be a very good lens for astro-photography: People use it with digital sensors and get very good pictures of the stars. I may have to try that sometime! In terms of limitations, it seems to produce some chromatic aberrations and color fringing. I have not had issues with that since I mostly used it with black and white film. Another limitation is its minimum focusing distance of 2,5m. This is not close enough to be able to fill the frame when shooting portraits. To get around that, I need to use extension tubes. It would have been nice to have a closer focusing distance out of the box. Bellow are a few sample pictures taken with it. The last one has been taken using one extension tube to get closer.
The Super-Multi-Coated MACRO-TAKUMAR / 6x7 1:4 / 135mm was released in 1971 (see pentaxforum.com). I don't not think I have shot more than a couple of pictures with this lens for now. From the information I could find, this is a good lens for close-ups. It has macro in its name but its maximum magnification is only about 0.3x. The minimum focusing distance is 0.75m. I should probably use this lens over the 200mm for taking close-up portraits of the kids. In terms of sharpness it seems to be quite ok, especially when stopped down. I'll have to experiment with it. So far I do not have sample pictures for that one but stay tuned!
The Super-Multi-Coated TAKUMAR / 6x7 1:2.8 / 90mm Leaf Shutter was released in 1971 (see pentaxforum.com). This is a normal lens on 6x7. The main benefit of it is that it is one stop faster than the other lenses I have. According to the information I could find, this is not a very sharp lens.From my experince with it it is hard to say if I have noticed it. Because I am scanning the negatives with a flatbed scanner, I am not really impressed with the sharpness of the images I get but the low quality of the scan makes it difficult to blame the lens. One interesting thing about this lens is that it has a leaf shutter built-in in order to allow for flash sync at up to 1/500s. I have not use the leaf shutter so far. Because of its rather inferior optical quality compared to the other lenses, I will probably not use it too much unless this focal lens is really a must. In the same range of focal lens, the one to get seem to be a 105mm f/2.4. Bellow are a few sample pictures. More pictures taken with this lens can be found in this autumn post.
The SMC PENTAX 67 1:4 45mm is a more modern lens which was released in 1989 (see pentaxforum.com). This is a wide angle lens which field of view is approximately equivalent to a 24mm lens on a 35mm camera. It is the main lens that I am using for shooting landscapes and it is the lens I typically have attached to the camera because it is the smallest in size and weight.  From what I could read it has a very good reputation in terms of sharpness, distortion and overall images quality. There seem to be no obvious cons to this lens but there is apparently a 55mm/f4 which is slightly sharper. I'll continue to use it! Bellow are a few sample pictures.

Conclusion

It seems that the set of lenses I have is pretty ok with the exception of the 90mm f/2.8 which is inferior to the others. If I get the opportunity I should get a 105mm f/2.4. Out of the other lenses, I should get some experience with the 135mm f/4 which seems to be a very good lens which I have neglected up until now. I will add more sample pictures as I go. I may also add pictures of the lenses themselves. Leave me your comments if you have any different experiences and/or recommendations for Pentax 6x7 lenses!
1 Comment

Autumn roll with the Pentax 6x7

11/1/2015

2 Comments

 
Picture
Went out in the forest with my assistant  (see portrait on the left) to capture some of the autumn colors and leaves. I took the Pentax 6x7, a few rolls of film and my Nikon D600 as a light meter (a bit bulky for the job but I do not have any proper light meter). We walked in the forest for a couple of hours and only shot one roll of film. Light and colors were quite nice but the sun went down quite quickly and my assistant had enough so we went back home.
​
​The film I loaded was a roll of expired Fujicolor PRO 400H. I found this roll laying around, it is expired since 2009, about 6 years ago. I am not familiar which this film so I really did not know what to expect from it. Because it was expired, I overexposed it by 1 stop, shooting it at EI 200 instead of the ISO 400 rating. I developed it normally with a Tetenal C-41 kit at 30°C for 8'30". The negative was scanned with the Epson V600 scanner and lightly edited using Darkroom (mainly levels adjustments).
Bellow are the 9 pictures we got from this roll. The 10th picture of the roll is the portrait on my assistant above :-) Overall I am quite happy with how the pictures turned out despite the fact that the film was expired and that I shot all picture handheld.
Bellow is a shot of the developed negative next to another Fuji 35mm negative which was not expired. I have no idea how the film base of non expired Fuji PRO 400H is supposed to look like but as with other expired films, it seem a bit dark, as if the film was slightly fogged. When I hang the film to dry, I was a bit worried that the image quality would be very poor but once scanned I was quite surprised by  both the color tones and the resolution.
Picture
The Pentax 6x7 is a fun camera to use, I will for sure take it out more often. For this roll I only took the 90mm f2.8 lens (which is a normal lens on 6x7) but I also have a 45mm wide angle and a 200mm telephoto which I would like to play with.
2 Comments

Film: Fuji Superia X-Tra 400

9/4/2015

0 Comments

 
Fuji Superia is another "consumer grade" film which is relatively inexpensive so I gave it a shot. It exists in different speeds from 100 ISO to 1600 ISO. I went for the 400 speed because I usually shoot HP5+ 400 and I would like to have a 400 speed color negative film to go to when I want colors. I just bought a 3 pack of this Superia X-Tra 400 to try it out. I ended up using one roll for testing my C-41 chemistry and shot the two other rolls in my Nikon FM3A. 

According to what I could read about this film, some like it and some don't but all seem to agree that greens and reds are a bit exaggerated (especially greens) and that it does not really give and good skin tones. That said it is considered to be a good all around film for its price as long as skin tones are not crucial. Let's see if this is somewhat verified by the pictures I have taken!
Picture
Bellow is a strip of developed Fuji Superia X-Tra 400 which shows the various markings and patterns on the edges of the film. The color of the base of the film seems to be slighly more greenish that the Kodak films I have tested before (Kodak Gold and Kodak ColorPlus).
Picture

Sample images

Bellow are a few images I got from the two rolls of Fuji Superia X-Tra 400 I have shot. I was not necessary very happy with the pictures I have got from those two rolls but I am not going to blame the film :-) The pictures were scanned with my Nikon LS-2000 film scanner using VueScan. I did not use and preset from VueScan and just saved the RAW image from the scanner. I then adjusted the curves and colors in Darktable.
Picture
Picture
Picture

Conclusion

So far, the scans I have got have been quite easy to work with. In comparison I think that I prefer the look of Kodak Gold and Kodak ColorPlus but they are both 200 films (I have not tested Kodak Gold 400). I have to find other 400 films to test to decide if this is a good film for me to use.
0 Comments
<<Previous
Copyright ©2016, All Rights Reserved.